Box2D C++ tutorials - Drawing your own objects
Last edited: July 14 2013
Chinese version ->
中文
Drawing your own objects
From the previous topic, it's obvious that using debug draw will not make for
a very visually appealing game. Usually we would like to use our own method for
drawing objects in the scene, and access the physics information
from Box2D so that we know where to draw them. In this topic, we'll
set up a class to use as a game entity, and then look at how to keep it in
the right place. We will do this by storing a pointer to a Box2D body
in the game entity.
For now all the entity class will do is render itself, but later
we will expand it to demonstrate other topics.
The focus of these
tutorials is not on rendering, so we'll just draw a basic smiley face on
a circle shape to confirm that it moves and rotates correctly.
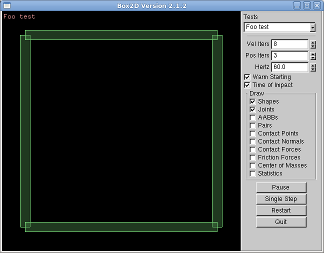
For this topic let's set up an empty fenced area to start with.
1
2
3
4
5
6
7
8
9
10
11
12
13
14
15
16
17
18
19
20
21
22
23
24
| FooTest() {
//a static body
b2BodyDef myBodyDef;
myBodyDef.type = b2_staticBody;
myBodyDef.position.Set(0, 0);
b2Body* staticBody = m_world->CreateBody(&myBodyDef);
//shape definition
b2PolygonShape polygonShape;
//fixture definition
b2FixtureDef myFixtureDef;
myFixtureDef.shape = &polygonShape;
//add four walls to the static body
polygonShape.SetAsBox( 20, 1, b2Vec2(0, 0), 0);//ground
staticBody->CreateFixture(&myFixtureDef);
polygonShape.SetAsBox( 20, 1, b2Vec2(0, 40), 0);//ceiling
staticBody->CreateFixture(&myFixtureDef);
polygonShape.SetAsBox( 1, 20, b2Vec2(-20, 20), 0);//left wall
staticBody->CreateFixture(&myFixtureDef);
polygonShape.SetAsBox( 1, 20, b2Vec2(20, 20), 0);//right wall
staticBody->CreateFixture(&myFixtureDef);
} |
Let's call our game entity class Ball since it will be round and bouncing:
1
2
3
4
5
6
7
8
9
10
11
12
13
14
15
16
17
18
| //outside and before the FooTest class
class Ball {
public:
//class member variables
b2Body* m_body;
float m_radius;
public:
Ball(b2World* world, float radius) {
m_body = NULL;
m_radius = radius;
}
~Ball() {}
};
//FooTest class member variable
std::vector<Ball*> balls; |
(To get the last part to compile, you may have to #include <vector> at the top of the
file.)
Notice that now instead of storing references to Box2D bodies directly, we let each game
entity look after that and we store a reference to the game entities instead. Add a render
function to the Ball class to draw a nice smiley face. The important thing to note here
is that we are drawing the face so that it is centered on the point (0,0) and it will not
be rotated. The radius is taken to be 1 for the default rendering.
1
2
3
4
5
6
7
8
9
10
11
12
13
14
15
16
17
18
19
20
21
22
23
24
25
26
| //Ball::render
void render() {
glColor3f(1,1,1);//white
//nose and eyes
glPointSize(4);
glBegin(GL_POINTS);
glVertex2f( 0, 0 );
glVertex2f(-0.5, 0.5 );
glVertex2f( 0.5, 0.5 );
glEnd();
//mouth
glBegin(GL_LINES);
glVertex2f(-0.5, -0.5 );
glVertex2f(-0.16, -0.6 );
glVertex2f( 0.16, -0.6 );
glVertex2f( 0.5, -0.5 );
glEnd();
//circle outline
glBegin(GL_LINE_LOOP);
for (float a = 0; a < 360 * DEGTORAD; a += 30 * DEGTORAD)
glVertex2f( sinf(a), cosf(a) );
glEnd();
} |
Just a couple more things to do. In the FooTest constructor, after the fenced area is set
up, add a Ball entity into the scene (this should really be deleted in the class destructor
if you wish to add that too).
1
2
3
| //add ball entity to scene in constructor
Ball* ball = new Ball(m_world, 1);
balls.push_back( ball ); |
And finally, to actually draw the ball entities we'll need to add
to the Step() function. If you put this after the call to Test::Step(), the ball
will be drawn on top of the existing debug draw data.
1
2
3
| //in Step() function, after Test::Step()
for (int i = 0; i < balls.size(); i++)
balls[i]->render(); |

Now we have one ball entity, but it's being drawn at the default location of (0,0) and
we didn't need a physics engine to do that huh? Let's add to the constructor of the
Ball class to set up a circle shape body for the ball. Now it becomes apparent why the
Ball constructor requires the b2World pointer:
1
2
3
4
5
6
7
8
9
10
11
12
13
14
15
16
17
18
19
20
| // Ball class constructor
Ball(b2World* world, float radius) {
m_body = NULL;
m_radius = radius;
//set up dynamic body, store in class variable
b2BodyDef myBodyDef;
myBodyDef.type = b2_dynamicBody;
myBodyDef.position.Set(0, 20);
m_body = world->CreateBody(&myBodyDef);
//add circle fixture
b2CircleShape circleShape;
circleShape.m_p.Set(0, 0);
circleShape.m_radius = m_radius; //use class variable
b2FixtureDef myFixtureDef;
myFixtureDef.shape = &circleShape;
myFixtureDef.density = 1;
m_body->CreateFixture(&myFixtureDef);
} |
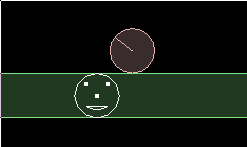
Ok, there is a physics body in the scene but our face is not being drawn at the body's position.
To do this, let's add another function to the Ball class to set up the OpenGL transform
before rendering. Depending on what rendering API you use, there may be better methods for doing this.
1
2
3
4
5
6
7
8
9
10
11
12
13
14
| //in Ball class
void renderAtBodyPosition() {
//get current position from Box2D
b2Vec2 pos = m_body->GetPosition();
float angle = m_body->GetAngle();
//call normal render at different position/rotation
glPushMatrix();
glTranslatef( pos.x, pos.y, 0 );
glRotatef( angle * RADTODEG, 0, 0, 1 );//OpenGL uses degrees here
render();//normal render at (0,0)
glPopMatrix();
} |
Don't forget to change the rendering call in the Step() function to use the new renderAtBodyPosition.
Now even if you turn the debug draw display off (uncheck the 'Shapes' checkbox on in the control panel)
your own rendering code still draws the ball at the correct position and rotation.

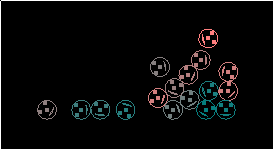
Just for fun we could use some more feedback from the physics engine to change the color of the
ball at different speeds. For example, set the color like this:
1
2
3
4
5
| //in Ball::render
b2Vec2 vel = m_body->GetLinearVelocity();
float red = vel.Length() / 20.0;
red = min( 1, red );
glColor3f(red,0.5,0.5); |
How about adding a whole bunch of balls to the scene - just change the FooTest constructor to loop a few times:
1
2
3
4
5
| //in FooTest constructor
for (int i = 0; i < 20; i++) {
Ball* ball = new Ball(m_world, 1);
balls.push_back( ball );
} |
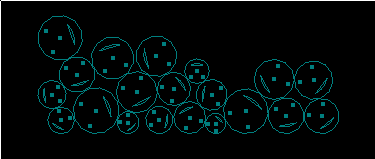
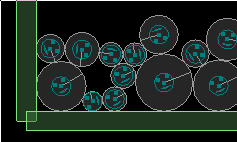
We could make the balls random sizes too, since variable sizes were considered when we set up the Ball class:
1
2
3
4
5
| for (int i = 0; i < 20; i++) {
float radius = 1 + 2 * (rand()/(float)RAND_MAX); //random between 1 - 3
Ball* ball = new Ball(m_world, radius);
balls.push_back( ball );
} |

Uh-oh... somethings not right here, the balls don't collide properly anymore. Or at least that's
what you could be thinking if this was a more complex scene, and you had confidently thrown away
the debug draw code in favour of your eye-popping fancy graphics. Since we have the debug draw ready
to hand, it only takes a second to see what's really going on in the physics engine:
Okay so that was a bit contrived, but I just wanted to illustrate the usefulness of having
a debug draw implementation available throughout your development progress.
Finally, to fix the size problem we just need to scale the rendering code:
1
2
3
4
5
6
7
| //inside Ball::renderAtBodyPosition
glPushMatrix();
glTranslatef( pos.x, pos.y, 0 );
glRotatef( angle * RADTODEG, 0, 0, 1 );
glScalef( m_radius, m_radius, 1 ); //add this to correct size
render();
glPopMatrix(); |