Editing fixtures
See here for a video explaining this topic: YouTube
To edit fixtures you must first be in fixture edit mode (shortcut key 'F').
Fixture types
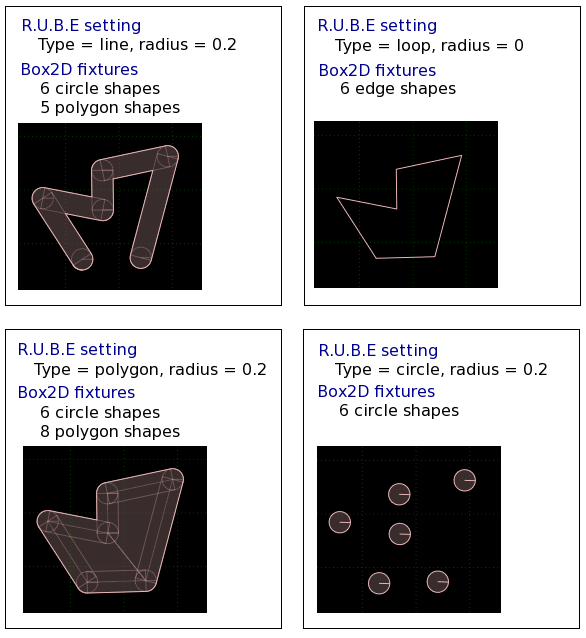
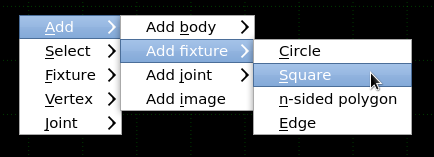
Fixtures in R.U.B.E are stored as a list of vertex points, a shape type and a radius. The final
Box2D fixtures used in player views and exported data are generated from this. By changing
the shape type and radius a variety of different configurations can be made.
For example, here are the same six vertices with some different combinations of type and
radius settings, and the resulting Box2D fixtures that are generated from them.
These settings can be made in the properties panel when a fixture is selected.
For more information on each shape type, see the topics below.
Adding fixtures to the scene
Fixtures always belong to a body, so they cannot be added to the scene as a standalone item. To
add a fixture you first need to select the body (or bodies) it should be added to.
Once you have a body selected,
fixtures are added to the scene by using the action menu. The new fixture
will be added at the cursor position. To bring up the action menu you can
either hit the Spacebar, or select the action under Scene in the main menu.
If you have more than one body selected when adding a fixture, all the selected bodies will have the
fixture added to them, at the cursor position.
Deleting fixtures
You can delete fixtures by selecting them and pressing the Delete key.
Manipulating fixtures
Fixtures can be translated, rotated and scaled in the same way as other items. Here are extra some things to be aware of when scaling
fixtures.
Axis-constrained scaling of circle shapes is not supported. Although the circles will appear to be scaled
into ellipses during the scaling action, they will become circles after the action is complete.
Using an axis-constrained negative scale to mirror fixtures will cause the vertex windings of polygon shapes to be
reversed - you may want to re-adjust the winding to be counter-clockwise after scaling.
Duplicating fixtures
Fixtures can be duplicated with the keyboard shortcut Shift+D. This will create a duplicate of all
selected fixtures and then enters the translation control mode -
because in most cases you will want to move the newly created fixtures to another location.
Duplicated fixtures will be attached to the same body as the original fixtures.
Please note that even if you cancel the translation by hitting Escape, the new fixtures have already been
created. A common pitfall when duplicating fixtures and then cancelling the translation, is that the
new fixtures will be in exactly the same position as the original ones, and it's easy to forget that they
are there. If you want to cancel the duplication completely you will need to undo once after cancelling
the translation.
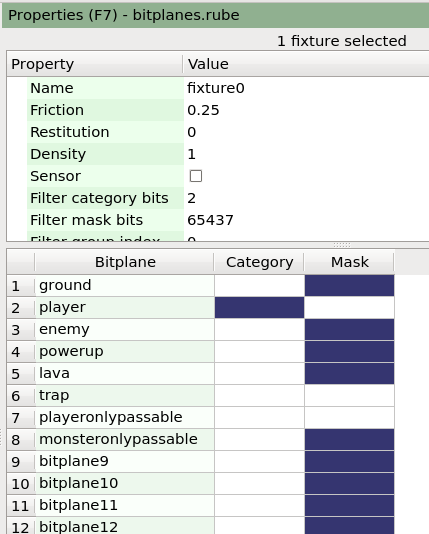
Checking collision settings
Figuring out the collision settings of fixtures can be confusing sometimes.
To help visualize which bits are set, you can check the table made specifically for this
purpose, shown by clicking the 'Collision settings' button at the bottom of the properties
panel, when in fixture edit mode. You can name each bitplane to help organize them.
Dark blue cells in Category and Mask columns indicate that the bit for that plane is set. Click the cells to toggle them.
For example in the screenshot below, we can see the settings for a fixure in the category 'player'.
This fixture will collide with the ground, enemies, powerups, lava, and things that only monsters can pass through,
but it will not collide with other players, traps, or things that the player can pass through.
When more than one fixture is set, cells for which multiple values are present in the selection will
be shown in a paler color. For example, here is how the table looks when we have both a player and the
ground selected at the same time (the ground collides with everything):

When only a single fixture is selected, this table has another special feature. When the mouse moves
over the cells in the Category and Mask columns, the fixtures that the selected fixture can collide with
will be highlighted in the scene.
Another way to quickly check which what a fixture can collide with is to hold down the F key while in
fixture edit mode, and move the mouse over fixtures in the scene. In the example below, we can see that
the truck body can collide with the ground and the crate, but not with the wheels; the front wheel
will only collide with the ground, and the crate will collide with the truck but not the wheels:

In this particular case, the collision bits of the truck and wheels are actually set so they would
normally collide, but the reason they don't is due to the joint between them having its collideConnected
property set to false. I told you it was tricky didn't I?
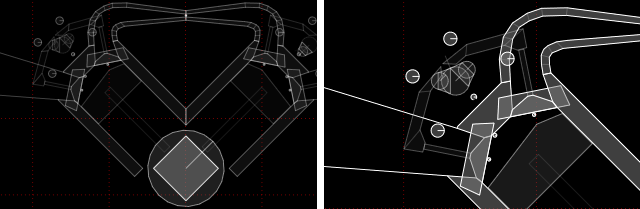
Checking fixture densities
The ratio of masses between bodies plays an important part in balancing the behavior of complex
structures, and the mass of a body is due to the density of its fixtures.Sometimes it can be handy
to visually check the relative densities of the fixtures in a scene. In fixture edit mode,
you can hold down the F key to display fixtures using full white for the most dense in the current view,
and scaling the opacity of other fixtures according to their density relative to that.
For example in the scene below, on the left we can see the square block at the bottom is much more dense
than anything else. When zoomed in further, the opacities are adjusted to give a better range of color
for the fixtures in view.
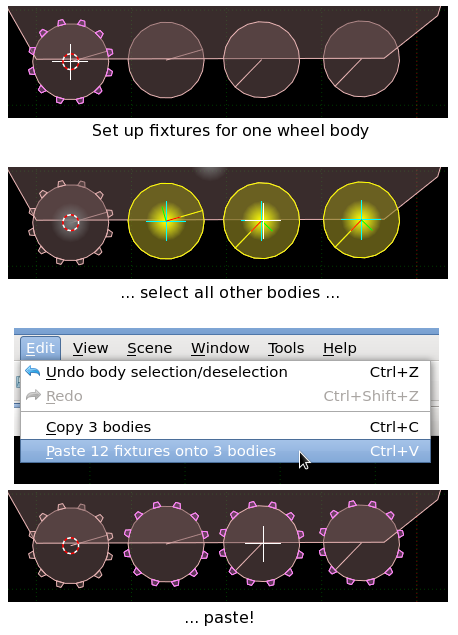
Copying and pasting fixtures
Fixtures can be copied and pasted. This is similar to
duplicating, but with the advantage that you can also paste fixtures into other scenes.
Another important difference is that fixtures will be pasted onto all selected bodies.
This can be useful in situations like the scene below,
where tire studs need to be set up for every wheel. You can first create the studs for
one tire, copy them, and paste them onto all the other wheel bodies.
Converting fixtures to JSON
When you copy a selection of fixtures, the information is stored in the clipboard as JSON formatted
plain-text which can be used in a number of ways. You can paste it into a text editor, alter some
values, and paste it back into R.U.B.E. Or you could save the selection to a file.
If you copy a single fixture, the resulting text in the clipboard can be given to the
addFixture script function to create
that fixture via script.