Editing images
See here for a video explaining this topic: YouTube
To edit images you must first be in image edit mode (shortcut key 'I').
Adding images to the scene
Images are added to the scene by using the action menu. The new image
will be added at the cursor position. To bring up the action menu you can
either hit the Spacebar, or select the action under Scene in the main menu.
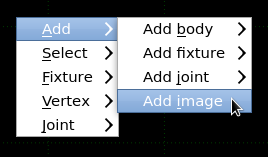
Selecting 'Add image' from this menu will open a file select dialog for you to choose the image. You
also drag and drop image files from the file explorer into editor views.
Support for PNG and BMP files is built in by default, but other formats will also be available depending on
which plugins libs are present. You can check which image formats are supported by turning on 'Show debug
messages' under the Debug tab of the Options dialog - this will cause a list of available formats to be
output in the message log when the program is started. Here are the typically supported formats:

About image sizes
Box2D has no concept of pixels, and neither does RUBE, so all dimensions in RUBE scenes are in physics units.
The 'height' property of an image is the height of the image in the world, and is not related to any specific
pixel measurement.
This means that you can use different resolutions for an image at run-time without having to change anything
in the RUBE scene, as long as the width/height ratio of the images is the same. For example, your RUBE scene
might be exported with a 25x50 pixel image, but this can be swapped for a 50x100 pixel image file when you
load the scene into your program, depending on screen resolution or other factors.
So because the 'height' property has no relation to pixels, the pixel size of images is ignored when adding them
to a scene. All images added to the scene are initially given a vertical height of 1 physics unit. This
can be inconvenient if you want images to be sized based on their pixel dimensions. To adjust the size of images
to take into account their pixel dimensions, you can use a script like this (note that you will have to decide
how many pixels should cover one physics unit):
    float pixelsPerUnit = 20;
    image[] imgs = getSelectedImages();
    for (uint i = 0; i < imgs.length; i++)
        imgs[i].setHeight( imgs[i].getPixelHeight() / pixelsPerUnit );
To automatically adjust the size of images when dropping them into the scene, you can attach a script like this
to the "Dropped images" event hook in the script hooks dialog.
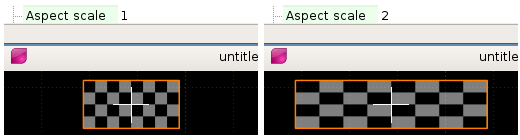
Aspect scale
Aspect refers to the width:height ratio of an image. When the 'aspect scale' property of an image is
1, the image will have the natural aspect of the loaded file. You can change this value to make the
image wider or narrower than it would normally be. For example, an aspect scale of 2 makes this image
twice as wide as the natural ratio:
Hitting the 'X' and 'Y' keys while scaling an image lets you set this property visually using the mouse.
Deleting images
You can delete images by selecting them and pressing the Delete key.
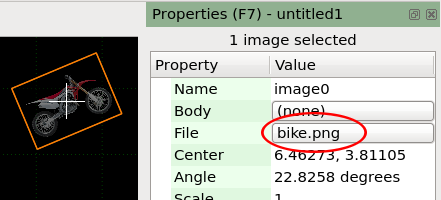
Changing the file of an image
If you want to change the file of an image without changing anything else about it, you can select
the image and then click the button in the File row of the properties panel. This will open the
file select dialog again.
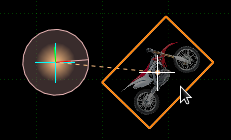
Attaching images to a body
When an image is first added to the scene, it has no relation to any body. You can attach an image to
a body by selecting the image and clicking the button in the Body row of the properties panel. This will
enter a temporary mode where you should then select the body to attach the image to.
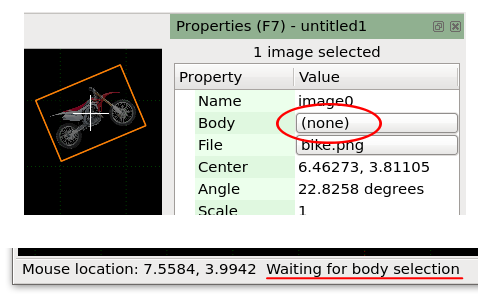
To cancel the attaching action, hit the Escape key.
Once an image is attached to a body, any changes made to the body (moving, rotating, scaling) will
cause the image to be changed as well. You can tell when an image is attached to a body by the dashed
line shown when the mouse hovers over it.
To detach an image from the body, repeat this procedure but click on an empty area of the scene
instead of clicking on a body.
Manipulating images
Images can be translated, rotated and scaled in the same way as other items. Here are extra some things to be aware of when scaling
images.
Scaling a body in one axis will cause any
images attached to it to be scaled equally in both dimensions. Scaling the body with a negative scale
value will cause the image to be flipped - you can correct this by rotating it 180 degrees and toggling
the 'Flip' property.
Duplicating images
Images can be duplicated with the keyboard shortcut Shift+D. This will create a duplicate of all
selected images and then enters the translation control mode -
because in most cases you will want to move the newly created images to another location.
Duplicated images will be attached to the same body as the original images.
Please note that even if you cancel the translation by hitting Escape, the new images have already been
created. A common pitfall when duplicating images and then cancelling the translation, is that the
new images will be in exactly the same position as the original ones, and it's easy to forget that they
are there. If you want to cancel the duplication completely you will need to undo once after cancelling
the translation.
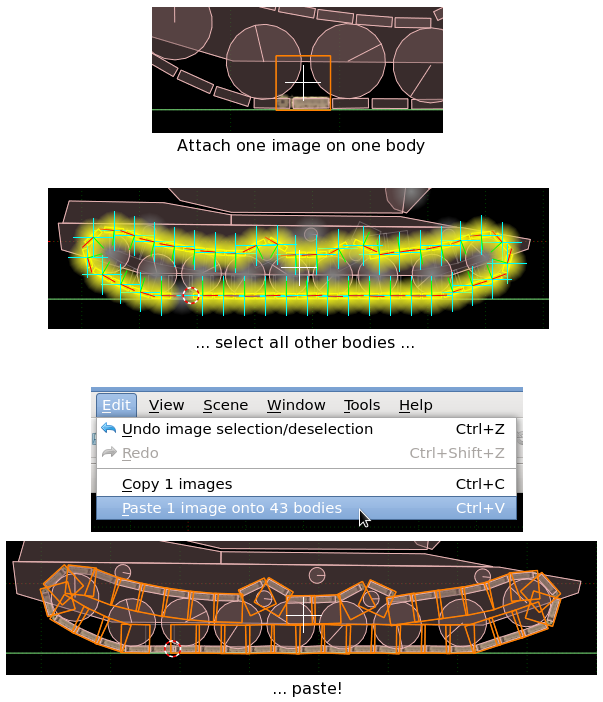
Copying and pasting images
Images can be copied and pasted. This is similar to
duplicating, but with the advantage that you can also paste images into other scenes.
Another important difference is that images will be pasted onto all selected bodies, or into
the background if no bodies are selected. This can be useful in situations like the scene below,
where many track segment bodies will have the same image attached in the same orientation. You can first attach the image to
one segment and adjust the position. Then copy the image, and paste it onto all the other track segment bodies.
Converting images to JSON
When you copy a selection of images, the information is stored in the clipboard as JSON formatted
plain-text which can be used in a number of ways. You can paste it into a text editor, alter some
values, and paste it back into R.U.B.E. Or you could save the selection to a file.
If you copy a single image, the resulting text in the clipboard can be given to the
addImage script function to create
that image via script.
File paths
By default the file location on disk will be exported as a path relative to the location
of the exported raw info file. Under the Export options tab of Scene settings dialog you can change
this to:
- the absolute path of the image file
- the path relative to the .rube file
- the path relative to the exported raw info file
- the path relative to a specified path