Editing bodies
See here for a video explaining this topic: YouTube
To edit bodies you must first be in body edit mode (shortcut key 'B').
Adding bodies to the scene
Bodies are added to the scene by using the action menu. The new body
will be added at the cursor position. To bring up the action menu you can
either hit the Spacebar, or select the action under Scene in the main menu.
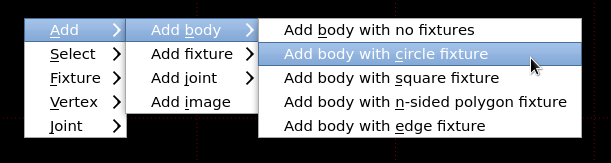
Choose one of the options under the 'Add body' menu to place a body at the cursor location. By default
the size of the added body will be 1 unit, so you will usually need to scale the body after creating it.
Deleting bodies
You can delete bodies by selecting them and pressing the Delete key. Note that any joints attached
to the bodies will also be deleted.
Manipulating bodies
Bodies can be translated, rotated and scaled in the same way as other items. Here are extra some things to be aware of when scaling
bodies.
All fixtures attached to the body will be scaled along with it.
Image scaling cannot be constrained to the X or Y axes so any images attached to the body will be scaled
equally in both dimensions.
All joint anchors in the body will be scaled along with it - usually this is the desired behavior.
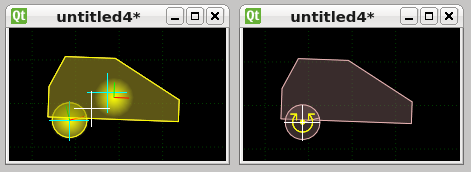
For example in the image below the car body has two joint anchors, one for each wheel. When the body
is scaled (the wheel bodies are not scaled), the joint anchors are moved to match the new size
of the body.
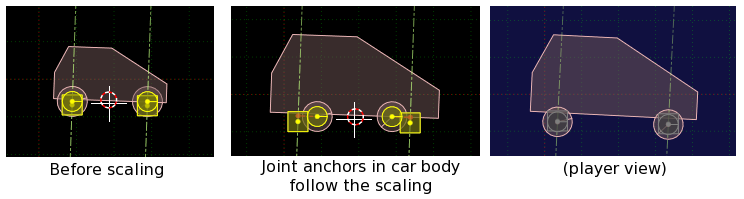
This means you can scale an entire structure of bodies and keep all their joints correctly positioned.
(However, if the joints have motors you will usually need to adjust the force/torque of the motors to
account for the change in body mass.)
Joints with length parameters will have their lengths adjusted to match the scaling - usually this is
the desired behavior, but if not you will have to adjust the joint length after scaling.
Mirroring bodies
Bodies can be mirrored by scaling while constrained to one axis (hit the 'X' or 'Y' key
to constrain the scaling to that axis). Here are some things to be aware of when doing this.
Holding down the Ctrl key while scaling will make the scale jump in discrete steps, so you can use this
to get an exact 1:1 mirroring.

Mirroring of revolute joint limits is not supported. After scaling, you will need to adjust the limits
for any revolute joints that were mirrored along with the bodies.
Joints with an axis will have their axis mirrored to follow the scaling. Notice how the joint axis of the
front wheel of the bike below has changed orientation. Usually this is the desired
behavior, but if not you will have to adjust the axis orientation after scaling.
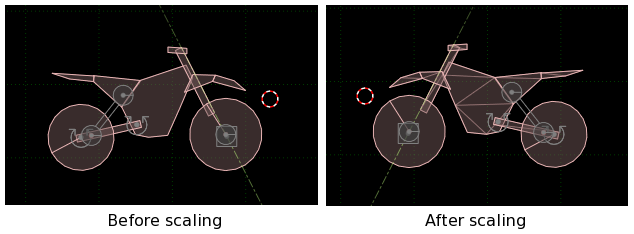
After mirroring, all fixtures of the mirrored bodies will have their vertex windings reversed - there is no problem
with this but usually you can get a more efficient polygon decomposition if you keep the vertices wound
counter-clockwise (note the extra polygons that have appeared in the scaled bike on the right).
More about vertex winding.
Duplicating bodies
Bodies can be duplicated with the keyboard shortcut Shift+D. This will create a duplicate of all
selected bodies (along with any joints attached to them) and then enters the translation control mode -
because in most cases you will want to move the newly created bodies to another location.
Please note that even if you cancel the translation by hitting Escape, the new bodies have already been
created. A common pitfall when duplicating bodies and then cancelling the translation, is that the
new bodies will be in exactly the same position as the original ones, and it's easy to forget that they
are there. If you want to cancel the duplication completely you will need to undo once after cancelling
the translation.
Copying and pasting bodies
Bodies (along with any joints attached to them) can be copied and pasted. This is similar to
duplicating, but with the advantage that you can also paste bodies into other scenes.
What happens to half-copied joints?
As mentioned above, copy/pasting of bodies will also create another copy
of any joints attached to them. However, this is only true when both of the
bodies the joint connects are part of the selection being copied. If the selection of bodies
being copied has a joint that is only connected to one body in the selection, this is
a 'half-copied' joint.
When a fully copied joint is pasted, it knows which two newly created bodies it
should connect, but a half-copied joint only knows one body in the selection. What happens to
the half-copied joint depends on whether the bodies are being pasted into the same scene as
they came from, or another scene. If they are pasted into the same scene the other side of the
half-copied joint will be connected to the original body, and if pasted into a different scene
it will be ignored.
Let's look at an example to help make sense of this... the scene below has three bodies and
two joints. Suppose we copy only the car body, and the left wheel body. This means the
joint on the right will be half-copied, because only one of its bodies is part of the selection.
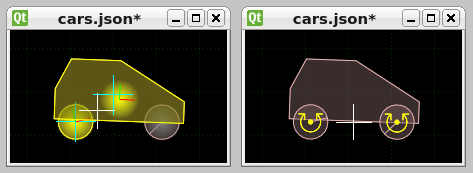
If we paste these bodies into the same scene (or duplicate them), then the missing side of the
half-copied joint will go to the original body it connected.
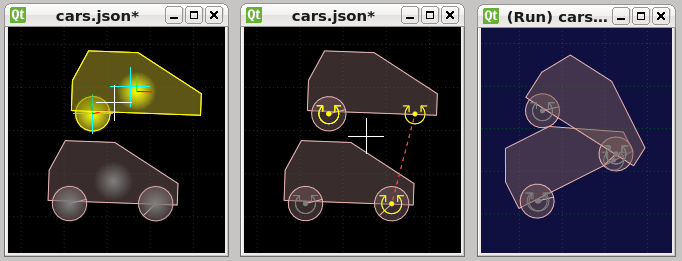
If we paste it into a different scene, the half-copied joint will be ignored.
Converting bodies to JSON
When you copy a selection of bodies, the information is stored in the clipboard as JSON formatted
plain-text which can be used in a number of ways. You can paste it into a text editor, alter some
values, and paste it back into R.U.B.E. Or you could save the selection to a file.
If you copy a single body, the resulting text in the clipboard can be given to the
addBody script function to create
that body via script.